Our little garden is cruising right along. We've had two good harvests of sugar snap peas, and we will probably do one more tonight. The plants don't seem to be re-generating peas as quickly and some of the leaves are turning yellowish brown, so we may be near then end of the season for sugar snap peas.
Next up to eat are the peppers. We plan to use our banana peppers to make stuffed peppers tomorrow night, and the green peppers should be great in chicken fajitas on Tuesday.
We've just started to see the first reddening of our tomatoes and should have a good crop in a few weeks. A few cucumbers have appeared and the largest is probably 3 inches long. Our herbs are growing like crazy, and we have a batch of dill drying in the basement.
Sunday, July 17, 2011
Breaking Down Chickens
J and I attended a knife skills class at Crate a few months ago, and one of the things we learned was how to break down a chicken. This part of the instruction was not hands-on, so I was nervous that it would be more difficult than the chef made it seem. I finally had the chance to put what I learned to use this weekend, and it was so easy!
I ordered 4 freshly butchered Freedom Ranger chickens from Freedom Farms and picked them up on Friday at the farmer's market. The chickens were $15 each and weighed probably 4-5 lbs each. On Saturday morning, J sharpened our knives and I went to town on the chickens.
First, I removed the legs and thighs from the body. Then I removed the breasts and finally the wings. I separated the legs and thighs and de-boned the thighs. I also removed the skin from the breasts. I saved the carcasses and thigh bones for broth. I vacuum-sealed all the pieces into the portion sizes we use the most: 1-2 breasts per package, 4 thighs per package, 4 legs per package and all 8 wings in one package. Our freezer is full! We really haven't been eating much chicken lately, so this stockpile should last for several months. We also still have a whole chicken in the freezer that I bought from another farmer's market vendor a few weeks ago.

It took me probably 30-40 minutes to break down the chickens and then another few minutes to vacuum-seal all the bags. I feel somewhat guilty using so much plastic, but if I want to eat pastured chicken, I have to have a way to store it. It's really a catch-22. For humanely-raised and butchered meat to be affordable, it really needs to be bought in bulk and in season and then used up over time. Vacuum-sealing and freezing is the only good way to do this. I could buy meat as we need it from the grocery store and have the butcher just wrap it in paper, but then we are supporting factory farming. I figure, we are trying to reduce our use of plastics in other areas, so freezing meat in plastic is an okay compromise in order to have healthy meat to eat throughout the year.
Friday, July 1, 2011
Homemade Butter
We try really hard to keep up with our meal plan each week so that we don't let ingredients go to waste. Sometimes, however, things just don't go according to plan. This past week we ended up with an unused pint of Natural by Nature grass-fed cream that we had intended to use for pasta with cream sauce. As we neared the cream's expiration date, I went searching through Home Cheese Making hoping to find a cheese recipe that called for a pint of cream. It turns out I was making things too complicated -- the best use for leftover cream is to make homemade butter with it. I was amazed at how easy this was. To make cultured butter, you can apparently add a bit of yogurt to the cream in the first step and allow it to sit on the counter overnight before shaking. Easy peasy :-)
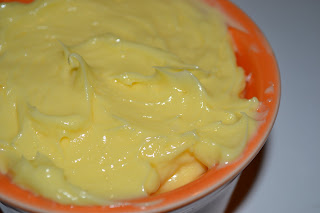
1) Pour cream into a clean mason jar; tightly screw on lid.
2) Allow to sit on the counter for a while to bring it to room temperature.
3) Shake the jar vigorously for approx. 5 mins or until you have butter.
4) Pour off (and reserve) buttermilk.
5) Scoop butter into a bowl; add cold water.
6) Knead butter with a spoon to release additional buttermilk.
7) Pour off water; add more cold water and repeat process until water stays clear.
8) Refrigerate butter.
Subscribe to:
Posts (Atom)